


I decided that I wanted to start a series of blog posts about planning a wedding. I planned my own wedding in just under three months, and I’ve witnessed several weddings over the past year. Therefore, I’ve picked up on a few things here and there 🙂 I planned my wedding on a very small budget, and we did a lot of things ourselves – starting with our invitations!

If you are going to make your own invitations, I highly suggest working with your partner, especially if you are doing it 100% from scratch like Steven and I did! The process of making invitations, figuring out what it was going to say, and how we wanted to do it was a huge exercise for us in terms of teamwork and communication. After the whole thing was over, I knew that if we could make it through that we could make it through anything :p It wasn’t easy, as we both had different ideas and methods, but we came together to create some pretty awesome invitations if I do say so myself.
#1. Create a sketch of what you want your invitation to look like.
This will help you both create a vision that will match your wedding, and your personalities.
#2. Make it match the colors of your wedding.
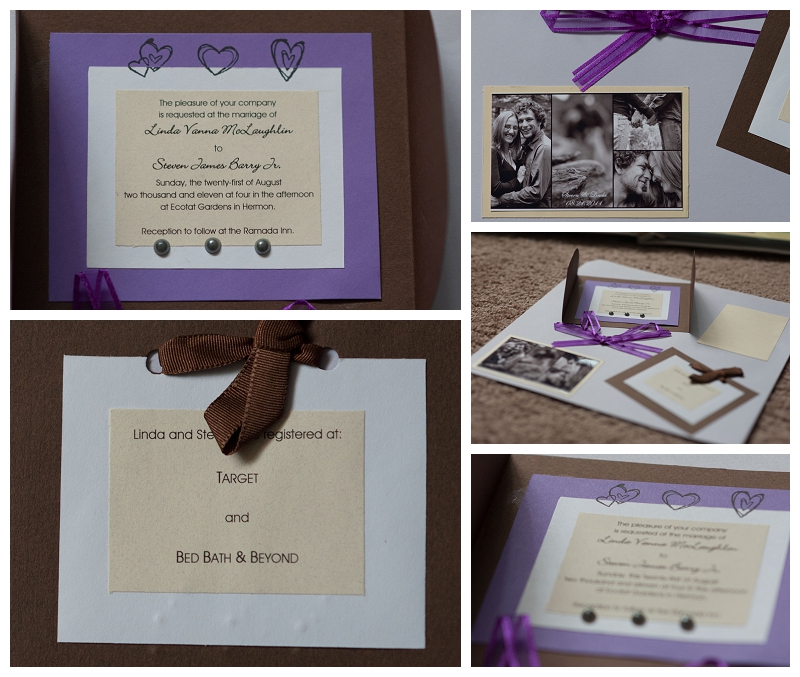
It provides a really cohesive look for your wedding overall 🙂 Our colors were a chocolate brown, and purple! So, we used the brown as the base for our invitations and had purple accents with the ribbon and a layer of purple underneath the actual wording.
#3. Determine how you want to embellish it.
We wanted to keep ours simple, so we used heart stamps, and some cool pearl beads that we just stuck onto the invitations!
#4. Look up different ways to write the invitation.
We had never been married before, so we had NO clue what to say! We researched different ways that invitations were written, meshed a couple of them together, picked out our fonts and typed it up! Just remember, “copy and paste” is your friend at this part of the invitation making process! I created two columns in a word document and just copied and pasted the words so we could have six on each page. Definitely a great way to use all of your supplies efficiently!
#5. Include information about where you a registered.
You do want gifts, don’t you?! 🙂 We included a smaller card that listed where we were registered.
#6. Also, include an RSVP card!
This way your guests can reply so you know how many people you are paying for. This doesn’t have to be anything fancy, just a small card that gets sent back. Again, you can look up different ways to word your RSVP.
#7. Do a test run.
Before we actually started making invitations by cutting things out in batches, we did a complete run-through of one invitation so we could make sure it all looked okay, and to get exact measurements that way we could cut out the pieces for five or six invitations at a time.
#8. Include a picture.
We didn’t do save-the-dates, as we were getting married in such a short amount of time. So, we included a small wallet sized-ish photo that had some of our engagement photos, and our wedding date so that people had something to hang up and refer to!
#9. Be sure to include pre-addressed, pre-stamped, envelopes for the RSVPs.
You are way more likely to get a timely RSVP if your guests already have an envelope with a stamp on it to send it back!
#10. Play to each other’s strengths.
Steven was really good at cutting out the big pieces, and cutting the slits into the invitation for our photo to “seal” the invitation, so he took care of those. I was really good at layering and gluing them, and we both added the pearls and stamps and tied them together.
We had a small guest list, so we only had to send out about 30 invitations, I think, so it only cost us about 75 dollars to get all of our materials (we had materials left over) and stamps for the pre-addressed envelopes, as well as the stamps to mail out the invitations. I adore how our invitations came out, and I love that we took the time to make them ourselves! There is a lot of freedom and flexibility when you make your own invitations so I encourage you to give it a shot! 🙂
If you liked this post, you might like these also!

[…] The last post I did was all about making your own invitations from scratch, which you can see here. Today I am going to talk about how I made my own wedding […]