


A while back, I created a blog post about white balance, and why its important. In that blogpost, I expressed my love for an ExpoDisc for setting my white balance. However, probably six months ago, I read Trevor Dayley’s article about shooting in Kelvin, so I tried it out. I was immediately hooked and sold my ExpoDisc.
Shooting in Kelvin (a measurement of temperature) is the ONLY way I set my own custom white balance now. It’s a little dial on my camera that I can set anywhere from 2,000-10,000. When I look at a scene, if it’s inside, with artificial lighting, I will typically be in the 3000-4000 range to start with. When I’m outside, and especially in the shade, I am usually upwards of 5000, especially when it’s sort of overcast and shady. Once you practice changing the white balance on your camera, it becomes a super quick process to set a custom white balance, which is so very important for speeding up your editing workflow.
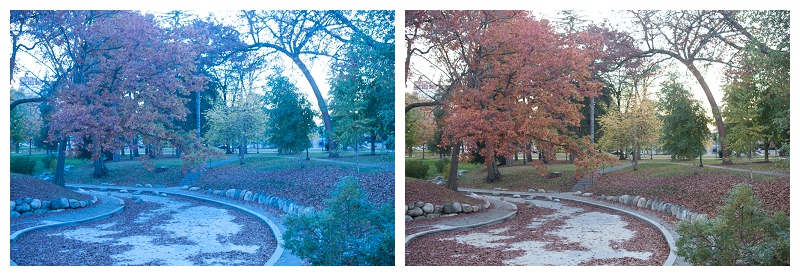
Here’s the key to remember: if your photo looks yellow, turn your temperature down. If it looks blue, turn the temperature up!

The picture on the left was at 3100, and the picture on the right was 5600. The first one was actually an accident, as it was still set from a previous session, and I immediately knew that I need to be in the 5000 range to even come close to the white balance I needed.
If you are not setting your own white balance, again, I encourage you to do so! It’s totally worth the change in terms of your skills and your confidence! Not to mention, it is SUCH a time saver!
If you liked this post, you might like these also!

comments +